Personal Data Storage and Backup Strategy Part 2 of 2
Keeping personal data safe and backed up
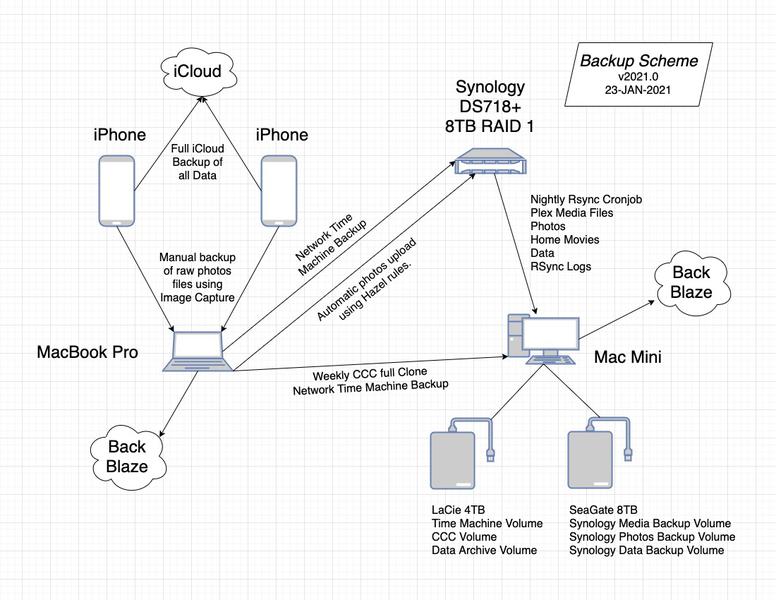
I'm continuing a description of how I have implemented a 3-2-1 backup strategy for my personal and family data. In a previous post, I described how the system was organized. In this post, I'm just going into further detail on the technical implementation of some of the automations.
How does it work?

Hazel
I use a macOS utility app called Hazel to automate the renaming and moving of the photo and video files I download from our phones to the laptop using Image Capture. Hazel is a powerful automation application according to the Noodlesoft website:
Meet Hazel, your personal housekeeper. Hazel helps you reduce clutter and save time by automatically moving, sorting, renaming, and performing various other actions on the folders that tend to accumulate lots of files (such as your Desktop and Downloads folders). Hazel’s extensive capabilities fall into two main categories: Folders & Rules, and Trash Management.
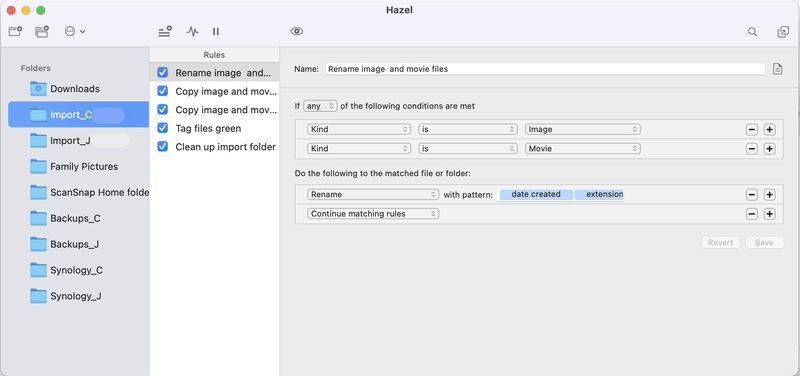
I am using only the most basic features of Hazel. Here is a screenshot of the rules I am using:

The import_C folder is where the raw files from the phone land. The import_C rules rename each of the files based on the date and time they were taken: YY-MM-DD HH-MM-SS.extension. Then a copy of each file is moved to a computer backup folder called Backups_C and one copy is moved to a Synology backup folder called Synology_C. Hazel then tags all the files green, and finally moves all the green tagged files to the trash. This way I can see any files that the rules missed and figure out what is happening.
Then there is a set of rules that run on the Backups_C and Synology_C folder that move the files to a folder in the Pictures directory on the laptop and shared network folder on the Synology. As part of the rules, the files are moved to folders that are organized by year and month. I have found this to be the best organization method over the years. As long as we can remember roughly when something happened, we can search for the photos and media for it. Here is what the folder structure looks like:
Photos_Directory
|
|--2020 (YEAR)
|  |--01
|  |  +-- Photos from January 2020
|  |
|  |--02
|  |  +-- Photos from February 2020
|  |
|  |--03
|  |  +-- Photos from March 2020
|  ...
|--2021
|  |--01
|  |  +-- Photos from January 2021
|  ...
Hazel is super fast and reliable, if the network share isn't mounted, it just waits until it is and runs the rules. As long as I put the original files in the right directory, everything works out.
Using Rsync to backup Synology files
There are three main tools that I use in order to automate the tansfer of files from the Synology to an external drive on the Mac Mini so they can be backed up to the cloud. First, I use SSH to establish a secure connection between the Synology to the Mac Mini. Once the communcation line has been established, rsync can compare the files and synchronize the data from the Synology to the Mac Mini. I then use cronjobs to automate the rsync jobs and have them run nightly. Finally, I am working on a strategy for managing the logs to keep track of the activity and possibly trigger an alert if it doesn't run. Here are the basic steps I followed to configure all of that, along with some helpfuls links that I used to accomplish it as each step could probably be a blog post on its own:
- Create a user account on the Synology to run the rsync job
- Configure SSH on Synology and Mac Mini
- Configure rsync commands
- Setup cronjob
1. Create a user on the Synology to run the rsync job
In the spirit of security and least privilege, I recommend creating a user account that will perform the rsync job with read-only privileges to the volumes and folders that you want to run rsync on. You can mis-configure rsync to delete files and by creating a read-ony account it helps prevent that possibility. You can create the account through the Synology DSM GUI by following the steps in this knowledge base article.
2. Configure SSH on Synology and Mac Mini
Establishing a secure connection between the Synology and Mac Mini is the first step in automating the backup. The two devices need to have a way to securely pass data to each other and we have to be able to do that without using a password, because it makes automation easier: enter ssh-keygen. ssh-keygen is a terminal command that creates a secure key the two devices can use to verify their identities without using a password.
- Login to Synology
- Enable ssh service
- Control Panel > Terminal & SNMP
- Make sure the rsync user has is in the admin group
- Control Panel > Users
- Select
rsyncuser, then Edit > Groups
- SSH into the Synology from the Mac Mini (or another computer) using the rsync account
- From terminal.app
ssh rsync@<synology ip address>- You will be prompted to add host to trusted hosts and then prompted for the rsync password
- Run ssh-keygen to create a private/public key pair on the synology guide 1 guide 2
- While logged in to the synology through ssh in the
rsyncaccount sudo suto switch to root accoutvim /etc/ssh/sshd_configto configure ssh- Uncomment the following lines:
#PubkeyAuthentication yes#RSAAuthentication yes#AuthorizedKeysFile .ssh/authorized_keys
synoservicectl --restart sshdto restart ssh serviceexitto return torsyncaccountssh-keygen -b 4096- Store key in default location with default name
- Press enter key when prompted to add a password to create a passwordless key pair. Both of these devices are on the local network behind a firewall. I would not recommend creating a passwordless key pair on any machines that exposed to the internet.
- Update permissions to ensure the connection works
chmod 0711 ~chmod 0711 ~/.sshchmod 0600 ~/.ssh/authorized_keys
- While logged in to the synology through ssh in the
- Copy the public key from the Synology to the Mac Mini
ssh-copy-id <username>@<mac mini ip>- Make sure Mac Mini is configured to accept rsa key auth
Now your Synology can create an ssh connection with the Mac Mini to transfer file data using rsync.
3. Configure rsync commands
While trying to configure the rsync commands, I created a directory on the Synology and filled it with some empty text files that I could test the rsync command to the target directory on the Mac Mini. guide 1 guide 2
- Create test files in the test directory on the Synology
mkdir test_dirto make a test directorytouch test_dir/file{1..100}to create 100 emtpy test files
- Create the target directory on the Mac Mini
cd path/to/backup/volumeto navigate to the volume you want to send the filesmkdir test_dir_backupto make an empty directory to receive the files
- SSH into the Synology to test the rsync commands
rsync -av –delete -e 'ssh -p 22' /path/to/test_dir <username>@<destination ip>:/path/to/test_dir_backuprsyncis the keyword to run the synchronization service-avflags will archive the files, meaning it will preserve the metadata associated with the files and provide verbose output that we can send to log files to monitor what is happening-deletewill delete files on the destination drive if they are deleted from the source-eallows for using a different shell than the default ssh'ssh -p 22'tells rsync to use ssh on port 22 for the file transfer/path/to/test_diris the source directory<username>@<destination ip>:/path/to/test_dir_backupis the ssh credentials and path to the destination for the data being synced
4. Setup cronjob
The last step is to automate the rsync job once the initial synchronization has finished. To do this, I had to use VI to edit the cronjob configuration, which itself is an adventure.
- Create a bash script to timestamp log entries guide
- While in the monitor account on the Synology, run the following commands:
mkdir scriptsto create a directory to store the scriptssudo nano scripts/timestamp.shto open an empty script in nano and then add the following lines listed at the end of the post.
chmod +x scripts/timestamp.shto make the script executable
- While in the monitor account on the Synology, run the following commands:
- Open the crontab file using VI or nano
crontab -e
- Add the following line for each directory to sync:
0 22 * * * rsync rsync -av --delete -e 'ssh -p 22' /volume1/PhotoShares eliza:/Volumes/ElizaBackup/SynologyPhotoBackup 2>&1 | /volume1/homes/rsync/logs/timestamp.sh >> /volume1/homes/rsync/logs/photo-cron.log
0 22 * * *sets the time to run the rsync job for 22:00 each day guidersync -av --delete -e 'ssh -p 22' /path/to/source/directory <username>@<destination ip>:/path/to/destination/directoryis thersynccommand to run2>&1 | /path/to/scripts/timestamp.sh >> /path/to/rsync.logtakes thersyncoutput and runs it through thetimestamp.shbash script and writes it to thersync.logfile- Check to make sure it works!
timestamp.sh script
#!/bin/bash
while read x; do
   echo -n `date +%d/%m/%Y\ %H:%M:%S`;
   echo -n " ";
   echo $x;
done
Final Thoughts
There is still work to do. I am working on a python scripts to rename and move the log files and send an alert if it looks like the cronjob has failed. It is really tempting to "set it and forget it" with cronjobs, making it important to create an alert when it fails. Backups are critically important and this workflow works for me but I am always looking for ways to simplify it and make it more reliable.
Resources
This post was inspired by a long series of posts on personal backup setups on 512 Pixels.
Backup diagram made with draw.io